Thursday, December 17, 2015

Pretty Paper Rose Ornaments for the Holidays


These little rose ornaments are easy to do and they'd make great last minute gifts.

Here's what you need to make your own flower ornaments:


Materials and supplies you need to do this project:

• clear glass Christmas balls
• paper roses
• sprigs of seeded eucalyptus
• scissors
• wire cutters
• low heat glue gun and glue sticks
• ribbon, decorative string or metal ornament hanger

Just a few words about the materials in this project: Glass ornaments can be found in a variety of shapes at craft stores. I bought round balls and glass hearts.


For the flowers I chose roses, but you could use any type of paper flowers.

Paper roses can be found at craft stores, but I have also found them at the Dollar Store for a much cheaper price. It pays to shop around!


Step 1: We are going to begin this project by making rose buds and individual petals.

Moving around the circumference of a paper rose, gently push back on the outer row of petals until the rose and the row of petals become separated. Snip off the wire stem and set aside the rose bud. Altogether you will need 6 or more rose buds.

Don't discard the outer row of rose petals and leaves!

Separate the leaves and rose petals by gently pulling them apart. Cut the two sections into individual rose petals and leaves.


Step 2: Remove the top of your glass ornament.

Take your wire cutters and snip away the stems of 3 or 4 roses as cleanly and neatly as you can.

Fill the ornament with roses and the petals you made in step 1. (Tip: I glued a couple of roses back to back so they'd way always be facing out from inside the ornament.)

Place the top back on the ornament. Now you are ready to decorate the exterior.


Step 3: Put a dab of hot glue on the back of a rose and attach it to the top front of your ornament. Flip the ornament over and attach another flower on the top back.

Step 4: Centre two more roses in between the first two flowers.


Step 5: Tuck two of the rose buds you made earlier in between the roses at the top of the ornament to fill in the gaps. 

Place one last rose bud just below the centre rose to create a bit of a cascade down the front of the ornament. Repeat on the back, adding a bud just below the centre rose. 

Finish with a couple of green leaves at the sides of each bud.


The final step is the most finicky and involves working with small pieces of Seeded Eucalyptus. 

Seeded Eucalyptus is fairly easy to find. I found this bunch at the grocery store, but it is also commonly available at most florists. 

I fastened the stems of my Eucalyptus together with an elastic band and hung them to dry, as I plan to use the Eucalyptus for other projects. For this ornament project however, we are going to use just the seeds and not the foliage. The seeds of the Eucalyptus are so dry I think you should be able to use them right away, without taking the time to dry bunches of Eucalyptus first.

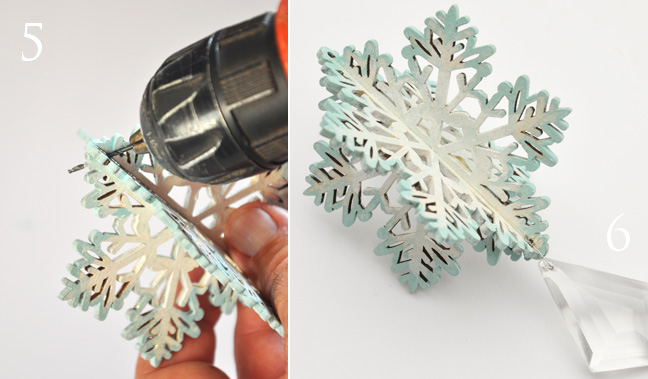
Step 6: Cut a large branch of seeds into small sections that are about 1/4" long (on the lower right hand side of my step 6 picture there is an example of these small stems)

Touch the seed's stem to the end of your glue gun to pick up the tiniest amount of hot glue. 


Tuck the seeds in among the paper roses.


Use some ribbon to create a hanger, or even easier, attach an ornament hook.


These ornaments would make a great stocking stuffer, hostess gift or present for your child's teacher.


Put your ornament in a pretty box and use more flowers instead of a bow. 
(I hot glued my flowers onto my gift box.)

I am sure any recipient would be thrilled with this heartfelt gift.

Wednesday, December 2, 2015

DIY Wooden Christmas Ornaments


Aren't the best tree ornaments always the homemade ones? 

It's the ones your kids made at school out of popsicle sticks or the ornaments you made yourself that end up having the greatest meaning and hold the best holiday memories.

This year I found some wooden ornaments at the craft store and inspiration struck! Here is what I created:


My first ornament makes use of old chandelier crystals.


Step 1: Start with a wooden ornament. (I happened to find these wooden ornaments at Michaels craft store.) 

Step 2: Paint it white using craft paint or any left over white latex paint you have on hand. (Note: I removed the rough twine hanger the ornament was purchased with to make the painting process easier. I attached a new ornament hanger as a final step in the process.)


Step 3: Paint the edges of the snowflake turquoise. Don't worry of you get some turquoise on the white part of your snowflakes while painting the edge. This is actually part of the look you are going for. 
You can always do a little touch up with a second application of white paint if you are unhappy with any section of the snowflake.


Step 4: Finish with a top coat of transparent glitter paint to add a bit of sparkle to your snowflake.


Step 5: Using a fine drill bit, drill a hole on an angle into the bottom of your snowflake. It is important to work slowly and carefully as the wooden snowflake is delicate.

Step 6: Insert a piece of fine string, fishing line or fine wire into your freshly drilled hole to tie on your crystal. We used a loop of fine wire, which we twisted closed. (Tip: If you don't have a chandelier crystal, search for a similar type crystal in the jewellery section of your local craft store.) 

Step 7: Add a Christmas ornament hanger to the top.


Hang your handmade ornament and enjoy that sparkle that only crystals can add to your tree!


I also created a star ornament using a small tassel.


To make the Star:

Step1: I removed the rough twine hanger the ornament was purchased with to make the painting process easier. 
Paint the wooden star colors of your choosing. I used three non-traditional colors: pink, orange and red. Add a top coat of transparent glitter paint.


Step 2: I found this cord and tassel at the Dollar Store. I cut the cord down to a suitable length for the bottom of my ornament.


I put a dab of hot glue at the bottom of my star and used the glue to attach the tassel. (Tip: Hold the tassel in place for a few seconds to allow the glue to set.)

Then I cut a length of the red cord and used it to hang my ornament.


One final variation on these wooden ornaments. 
This time, I wanted to add the potential for a pleasant jingle.


To make the Ball:

Step1: Paint the wooden Christmas ball colors of your choosing. I used a mix of blues and green. Add a top coat of transparent glitter paint.

Step 3: Using a fine drill bit, drill a hole on an angle into the bottom of your Christmas ball. Work slowly and carefully as the wooden ball is delicate.


Step 3: Using a piece of fine string, fishing line or fine wire to attach a silver jingle bell to your ornament. For my Christmas ball, I used a fine silver string. I looped it through the hole and tied a reef knot to secure my bell.

Step 4: Attach a Christmas tree ornament hanger to the top of the finished ball.


Happy crafting for the holidays!

Thursday, November 19, 2015

Snowy Owl Holiday Wreath


To make this wreath you need:

• basic store-bought evergreen wreath

• sharp scissors or pruners to cut branches

• wire cutters

• light gage florist's wire

• 3 eye screws 3/4" in length

• two types of faux snowy branches

• 3 snowy owls (mine came from Loblaw grocery store and were about $6 each)

• snowflake ribbon with wired edge (craft store)

• small blue & silver jingle bells

• 3 large silver jingle bells

• floral pics


Before you start, turn your wreath over and create a wreath hanger with a loop of florist's wire (if there isn't a hanger already). 

I also removed the original bow and pinecones from my store-bought evergreen wreath.


Step 1: I used two different faux snowy branches: one pine and one glittery twigs (seen at the top). Take each set of branches and cut the stems into several smaller sections. (I made mine 6-10" in length. If you cut them much shorter, they will be too short to work with.)


Step 2: Working in a circle, insert the first type of snowy branches into your wreath and allow them to catch in the mix of evergreens. (Tip: Inserting the branches at a low angle helps them to catch best in the evergreens.) 

Loop a length of florists wire through the wreath to hold each branch in position. Twist the wire at the back of the wreath to keep your branch secure.

Step 3: Again, working in a circle, insert the second type of snowy branches and allow them to catch in the mix of evergreens.

Loop a length of florists wire through the wreath to hold each branch in position. Twist the wire at the back of the wreath to keep your branch secure.

Hang the wreath to make sure the branches are evenly dispersed and you are happy with them before you move further.


Step 4: Make a bow. I chose a blue and silver snowflake ribbon that I felt worked with my theme.

Turn the bow over and run a length of florist's wire through the bow's centre knot.


Poke the ends of the wire through the wreath and twist them into a knot on the wreath's reverse side to fix the bow in place. 

Trim away any excess wire with your wire cutters. 


Step 5: (Depending on what you are able to find, you'll have to adapt your method for attaching the owls. The owls I found had a foam backing.)

Turn your owl over. Insert an eye screw into the foam and thread a piece of florist's wire through the eye. Twist the wire with a circular movement to knot it to the eye. (Note: I started with the small eye screw you see here, but found it did not hold well enough. In the end, I went with a much larger screw that was 3/4" long. I thought the method was clear enough, so I didn't reshoot the picture.)

Place all the owls on the top of your wreath to determine placement. Remove two of the owls once you know approximately where you want them to sit on the wreath. 

Now attach the first owl. Poke the ends of the wire through the wreath and twist a knot on the reverse side to fix the owl in place.


Add back the other two owls, one at a time.


Step 6: Wire smaller blue and silver jingle bells onto flower pics (you can find floral pics at the craft store) and insert the pics into the wreath.

I also used a length of wire to attach a number of larger silver bells directly.


You're done! Just hang up your wreath and enjoy it.
Happy holidays!

Teddy Bears & Toys Holiday Wreath


To make this wreath you need:

• basic store-bought evergreen wreath

• berry clusters 

• wire cutters

• light gage florists wire

• wooden holiday ornaments

• glue gun and glue sticks

• teddy bear ornaments (mine came from Sears and were about $6 each)

• red gingham ribbon with wired edge (craft store)

• floral pics (craft store)


Before you start, turn your wreath over and create a wreath hanger with a loop of florist's wire (if there isn't a hanger already). 

I also removed the original bow and pinecones from my store-bought evergreen wreath.


Step 1: I was able to find ready-to-go berry clusters wrapped in floral tape. If you can't find something similar, cut a larger branch with faux berries into smaller pieces (about 6-8 inches long). 

Working in a circle, insert the berry clusters into your wreath and allow them to catch in the mix of evergreens. 


Step 2: Make a bow. Turn it over and run a length of florist's wire through the bow's centre knot.

Poke the ends of the wire through the wreath and twist a knot on the wreath's reverse side to fix the bow in place. 

Trim away any excess wire with your wire cutters. 


Step 3: Remove the teddy bear ornament rope hangers, if there are any. Turn your teddies over. Insert a safety pin into each bear and fasten it (Note: I used a giant safety pin so it would be easier to see in this demonstration. You can use a much smaller one.) 

Attach a length of wire to each safety pin.


Place all the teddies on the top of your wreath to help you to determine placement. Remove all but one, once you know approximately where you want them to sit. 

Now attach the the first bear. Poke the ends of the wire through the wreath and twist a knot on the wreath's reverse side to fix the teddy bear in place.


Add back the other teddies, one at a time.


Step 4: I used small wooden ornaments to make my "toys".

Remove the hanger from the ornament. Place a generous glob of glue at the base of the wooden ornament and insert a floral pic into the glue. Hold the floral pic in place for a minute to let the glue set.

Place your toys on the wreath in between the teddies and the berries.


You're done! There is nothing left to do now, but hang up your wreath and enjoy it.
Happy holidays!

Butterfly Holiday Wreath


To make this wreath you need:

• basic store-bought evergreen wreath

• faux red berry branches

• wire cutters

• light gage florists wire

• assorted colored butterflies

• red ribbon with white stitches along the edge

• floral pics


Before you start, turn your wreath over and create a wreath hanger with a loop of florist's wire (if there isn't a hanger already). 

I also removed the original bow and the pinecones from my store-bought evergreen wreath.


Step 1: I started with one large bunch of faux berries and cut the stems into 2 smaller branches. (I made my smaller branches about 10" in length)

Leave a spot at the bottom of the wreath for your bow. Working up either side of the circle, insert the berry branches into your wreath and allow them to catch in the mix of evergreens. Tie each branch in with a length of florist's wire.


Step 2: Make a bow. Turn it over and run a length of florist's wire through the bow's centre knot.


Poke the ends of the wire through the wreath and twist a knot on the wreath's reverse side to fix the bow in place. 

Trim away any excess wire with your wire cutters. 


Step 4: The butterflies I purchased where already wired. You could use them as is, but I decided to make mine more sturdy by wiring them onto a floral pic.

Working your way around the circular wreath, insert the butterfly pics every couple of inches. Vary the angle of insertion and alternate the color of the butterflies as you work your way around the wreath.


And you're done! There is nothing left to do now, but hang up your wreath and enjoy it.
Happy holidays!